Getting Started
Welcome to Front Porch AI — a private, offline-first app for chatting with AI characters, right on your own computer.
This guide walks you from a fresh install to your first conversation. No technical background needed.
What Is Front Porch AI?
Front Porch AI is a desktop app for Windows, macOS, and Linux that lets you chat, roleplay, and tell stories with AI characters — with everything running on your machine.
Out of the box, the app runs AI models locally, so your conversations never leave your computer. If you'd rather use a big cloud model instead, you can connect services like OpenRouter — but that's always your choice, never the default.
What makes it special:
- The Realism Engine — characters have moods, build trust with you, feel time passing, develop obsessions and goals, and grow new personality traits as your story unfolds. Settings → Porch Life is where every living-character switch lives (Journal, clock, Pockets, Chaos, Objectives — each on its own, Realism is not the master key).
- Long-term memory — each character keeps a private journal of what mattered and brings it back later. Those memories belong to that one chat and never leak into another.
- Voice — characters can speak (local text-to-speech with 50+ voices) and you can talk back (push-to-talk voice input). Cloud voices from ElevenLabs and OpenAI are optional extras.
- Group chats — put several characters in one scene and watch them interact.
- Worlds and places — give a story a setting with its own lore, seasons, weather and climate. A place can even have thin air or heavy gravity, and characters react to it.
- Porch Stories — turn your chats into full illustrated novels.
- The Stoop — a built-in community hub for sharing and downloading characters, whole group casts, and places. Browse and download without an account; sharing and comments need a free one. Opt-in, strictly 18+. Details: FAQ → The Stoop.
It's free and open-source (AGPL-3.0). Your characters, chats, and memories stay on your machine.
Privacy promise: By default, nothing leaves your PC. Remote AI services and The Stoop are strictly opt-in. If you do sign up for The Stoop, it stores your account info and the cards you choose to upload — the rest of the app stays fully local. Details in the Privacy Policy.
What You Need to Run It
Front Porch AI runs on a wide range of hardware. A gaming PC is great; a modest laptop works too.
| Minimum | Recommended | |
|---|---|---|
| Operating system | Windows 10, macOS 12 Monterey, or a recent Linux distro | The latest stable release of your OS |
| Memory (RAM) | 8 GB | 16 GB or more |
| Graphics card | Optional — the app can run on your CPU alone | A GPU with 8 GB+ of VRAM (its own memory), or an Apple Silicon Mac |
| Disk space | 10 GB free | 50 GB+ if you want room for several AI models and voices |
About graphics cards: a GPU makes the AI respond much faster, but it isn't required. The app detects your hardware automatically and picks the best setup for you:
- NVIDIA cards — fastest option, fully supported.
- Apple Silicon Macs (M1 and newer) — excellent performance, fully supported. Intel Macs can't run local models — you have to point the app at a remote service yourself (see below).
- AMD and Intel cards — supported.
- No GPU at all — still works. Smaller models run fine on a CPU.
No capable hardware? No problem — skip local models entirely and connect a remote service like OpenRouter. You get access to the biggest models available, and the rest of the app works exactly the same.
Installing the App
The short version:
- Go to the Releases page.
- Download the latest stable build —
.exeinstaller for Windows,.pkginstaller for macOS (signed & Apple-notarized, so Gatekeeper opens it without a fuss),.AppImage/.deb/.rpmfor Linux. - Install and launch it.
On Linux you can also install through your package manager (recommended — updates arrive automatically). Full instructions for every platform, including package-manager setup, are in the Installation Guide.
Curious about new features early? Nightly builds come out most days — whenever there's new work to ship. They use a completely separate data folder, so they never touch your stable characters and chats. Rough edges are expected — and on nightlies the Backups & Restore page opens but its contents are replaced by a notice, so there is no way to browse or roll back a snapshot there. The automatic snapshots themselves keep running. Keep your real characters and chats on the stable build.
Your First Launch
The first time you open Front Porch AI, a dark overlay titled "Starting Front Porch AI" appears while it checks whether an AI engine is already installed. There's no long wizard to click through — just one question.
If no engine is found, the overlay asks "How will you run your AI?" and offers three answers:
- KoboldCpp — managed by Front Porch AI (recommended). The app downloads and runs the AI engine for you (KoboldCpp is the program that actually runs AI models on your computer). The download starts immediately, in the background.
- I have my own backend. OpenRouter, Nano-GPT, oMLX, LM Studio, or any OpenAI-compatible service — local or cloud. Nothing is downloaded; you fill in the details in Settings → Backend.
- Not sure yet. Same as the first option: the engine is fetched quietly in the background so everything just works when you're ready.
Pick one and the overlay disappears straight away. Nothing is downloaded before you answer, and you can change your mind any time in Settings → Backend.
On an older Windows or Linux PC that has neither modern CPU instructions nor an NVIDIA card, a warning appears on this screen first, so you know local models will be slow before you choose them.
While the engine downloads, a small card in the corner of the app shows progress, speed and time remaining. You can browse, create characters and set things up while it finishes. If the download fails, that card becomes Engine download failed, showing the reason and a Retry button. If you answered "I have my own backend", no card appears at all — there's nothing to download.
Your hardware — graphics card, its memory, and system RAM — is detected quietly in the background on every launch, so the app can suggest sensible defaults without you doing anything.
If setup itself hits a problem, you'll get a plain-English error with Retry Setup and Continue to App anyway buttons.
On an Intel Mac: local models aren't supported, so the app skips this whole routine — including the "How will you run your AI?" question — and drops you straight on the home screen. It does not switch you to a remote service for you. The app is still set to the local engine it can't run, so nothing will answer you until you open Settings → Backend and pick OpenAI-Compatible API yourself. A warning on that screen tells you the same thing: "Local inference is not supported on Intel Macs. Only Remote API mode is available."
On a nightly: you may be offered the option to import a copy of your stable library so your characters are available for testing.
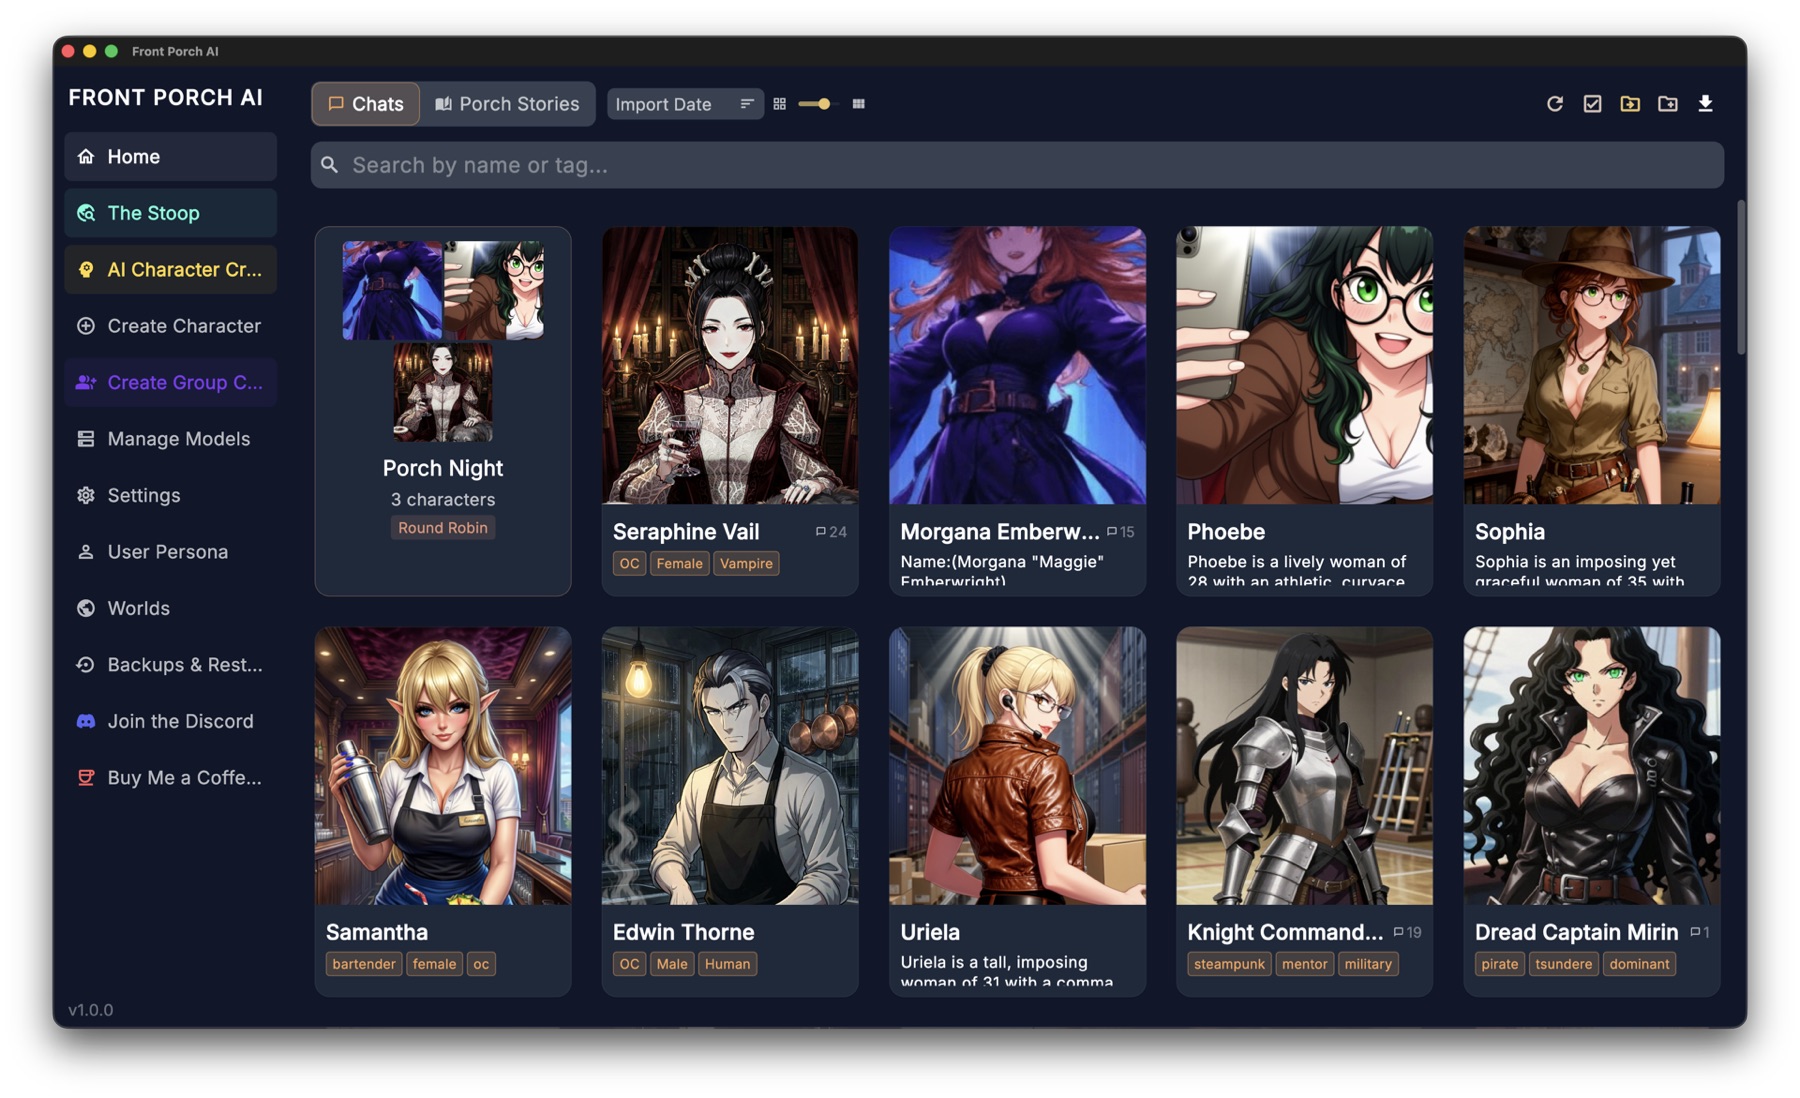
The home screen after setup. Your characters, folders, and group chats live here. The toolbar at the top handles creating, importing, and searching.
Powering the AI: Local or Remote
You have complete freedom in how the AI itself runs — fully local, fully remote, or a mix.
Option A: Local models (recommended)
The app manages everything for you. You never touch a command line.
To get your first model:
- Open Manage Models from the left sidebar.
- Search for a model by name — the search runs against HuggingFace, the main library of free AI models.
- Pick one and click download. Each result shows the file size and an estimate of whether it fits your graphics card.
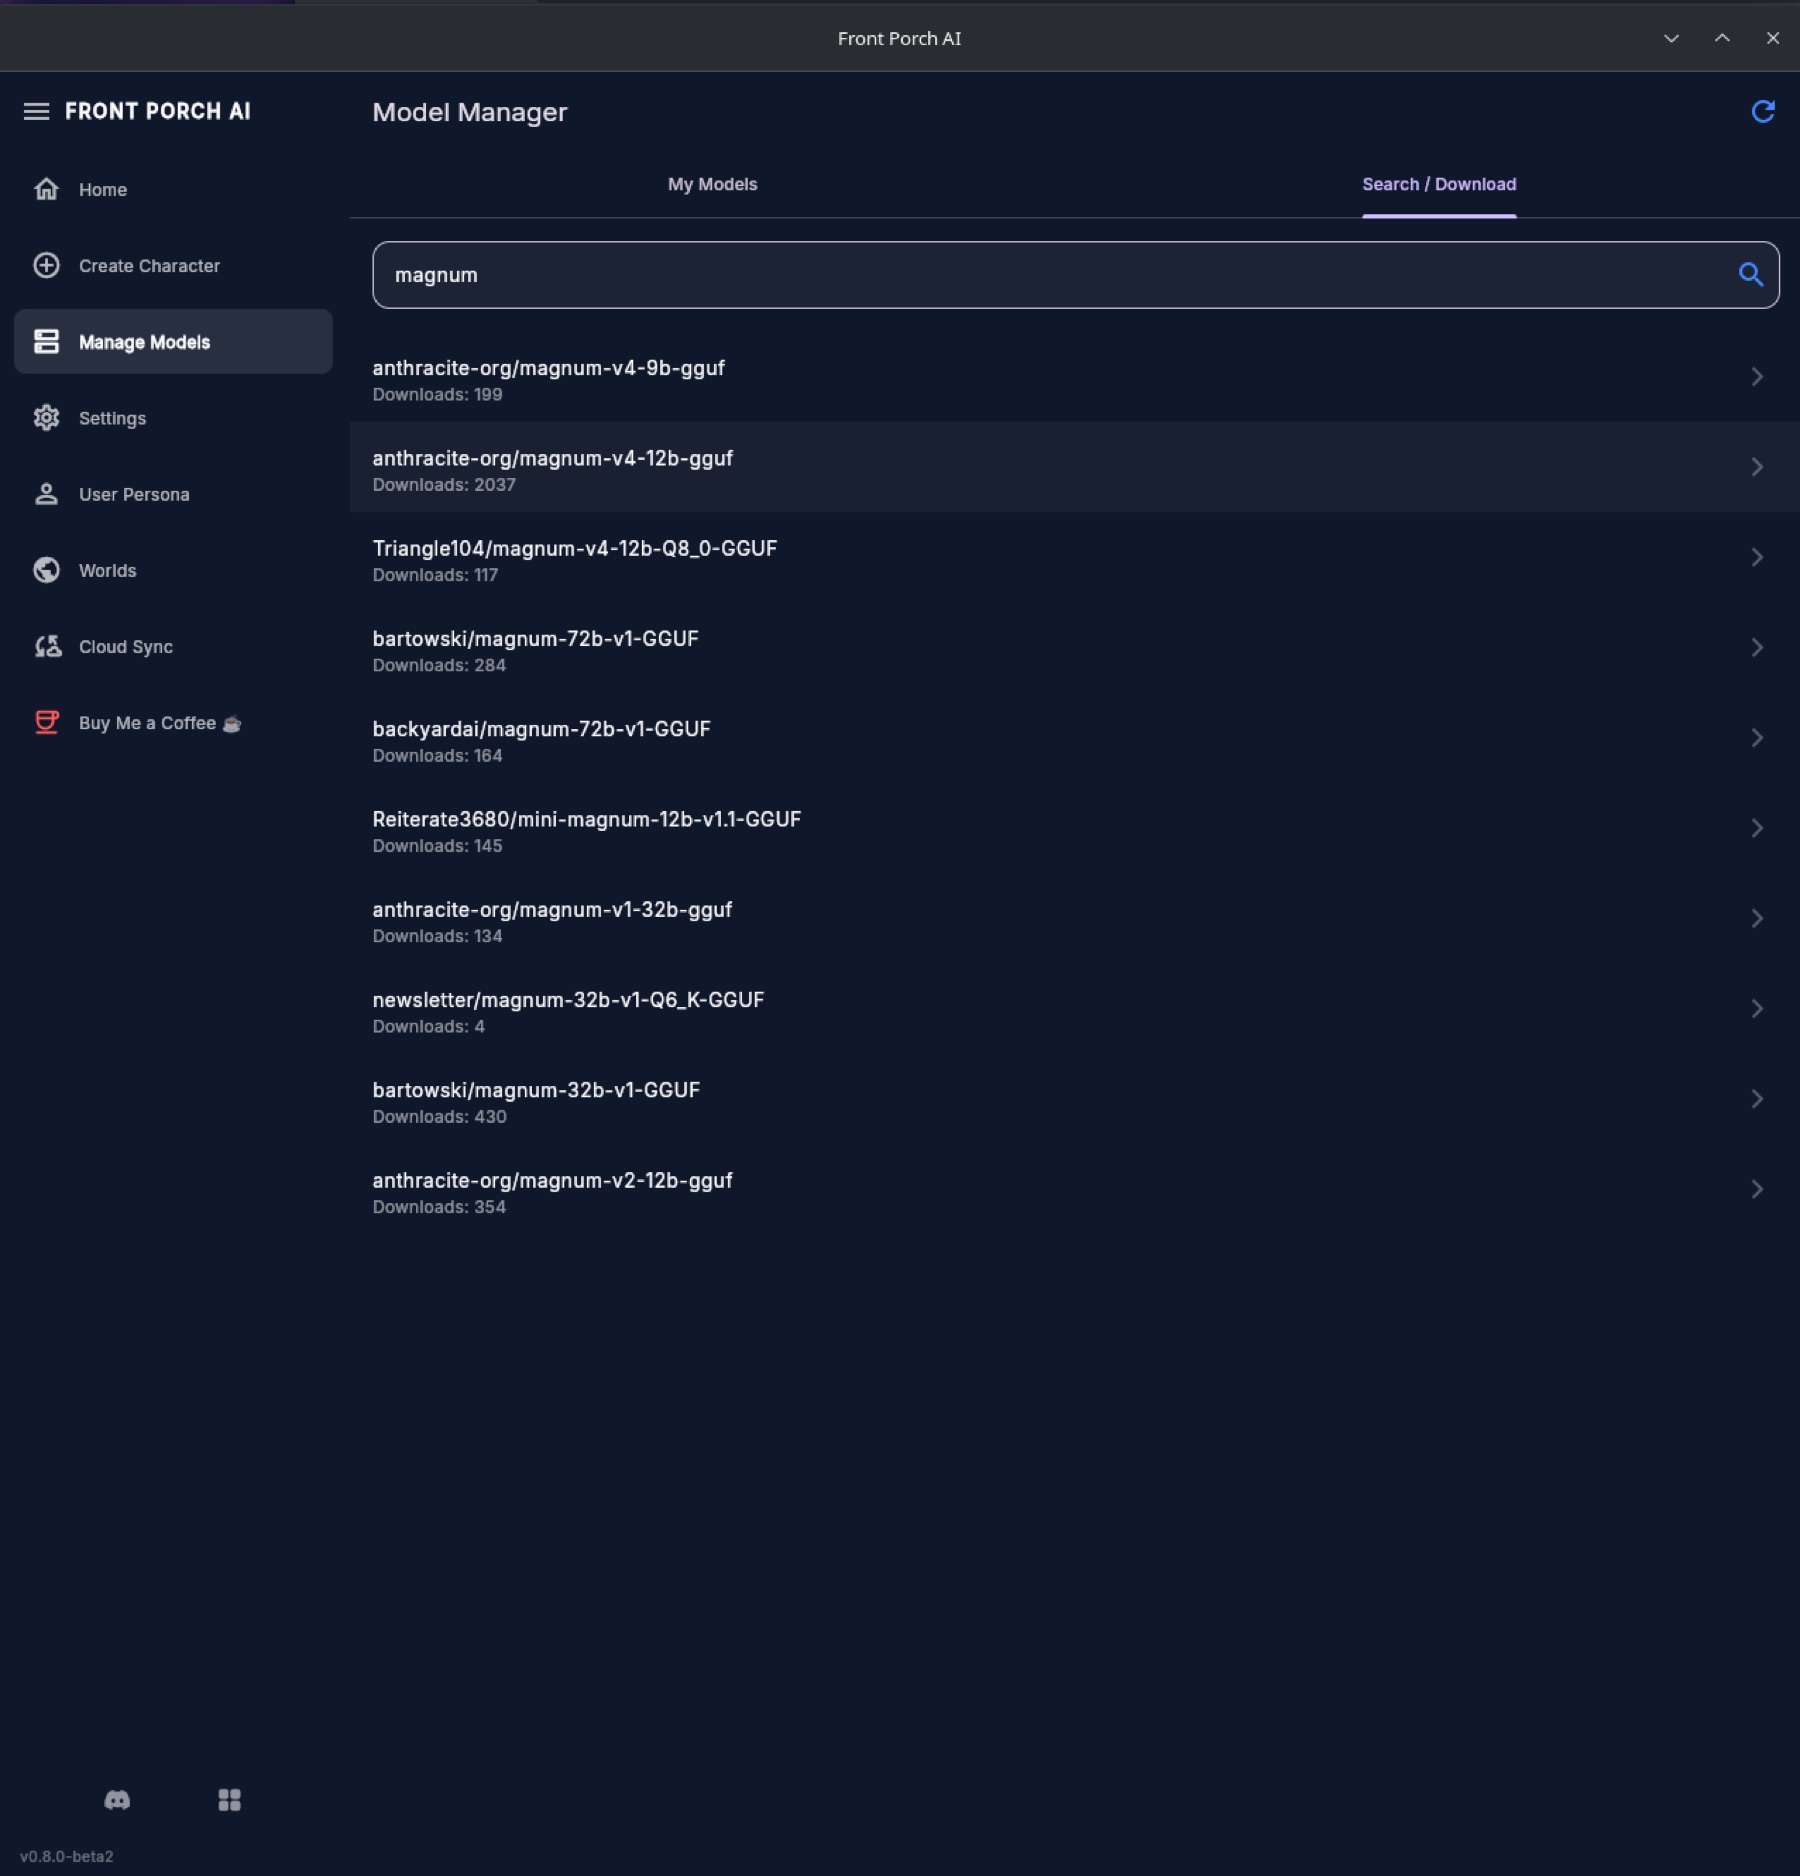
A few terms you'll see while browsing:
- GGUF — the file format local AI models come in. It's the only format you need.
- Quantization (names like
Q4_K_M) — a compressed version of a model. Smaller numbers = smaller file and lower quality. Q4 is the sweet spot for most people. - 7B, 12B, 70B… — the model's size in billions of "parameters." Bigger is smarter but needs more powerful hardware.
What should you download first?
| Your hardware | Start with |
|---|---|
| 6–8 GB graphics card, or Apple M1/M2 | A 7–9B model at Q4 |
| 12–16 GB graphics card, or M-series Mac with 16 GB+ | A 12–14B model at Q4 |
| 24 GB+ graphics card | A 20–70B model (quantized) |
| CPU only / older laptop | A 3–7B model at Q4 — smaller, but still fun |
Modern small models are genuinely good at roleplay. Most people are surprised.
Already have .gguf files from elsewhere? The cheapest way is to drop them into the app's models folder — the app scans that folder and everything inside it, subfolders included, so your files simply show up. Manage Models also has two small icon buttons in its header (hover for the labels): Import from Computer pulls a .gguf in from anywhere on your disk, and Change Models Folder points the app at the folder you already keep them in. One warning about importing: it copies the file rather than moving it, so a 20 GB model then occupies 40 GB. If space is tight, move the file in by hand or change the folder instead.
Option B: Remote services
Prefer the biggest frontier models, or don't have the hardware? Connect a remote service in Settings → Backend:
- OpenRouter — popular, with a huge catalog of models.
- Nano-GPT, LM Studio, or any other OpenAI-compatible service (there are one-tap Quick Connect buttons for the common ones).
- oMLX — not remote at all, but it's configured in the same place: a model server that runs locally on an Apple Silicon Mac, with its own option in the Backend list.
- OpenAI itself.
Enter your API key once and you're done. Remember: remote means your chat text is sent to that provider — that's the trade-off for the extra horsepower.
Option C: Mix and match
Plenty of people run a local model for everyday chatting (free, private, unlimited) and switch to a remote model for heavy lifting — like generating a detailed new character or writing a Porch Stories novel. Switching backends takes a few seconds in Settings, and the app remembers your last setup.
Your First Chat
1. Get a character
From the home screen you can:
- Create one with AI — click AI Create, type a short concept ("a sarcastic Victorian inventor who loves tea"), and the app generates a complete character: description, personality, greeting, sample dialogue and a lorebook. If you've set up image generation, it can draw a matching portrait too, in the art style you pick.
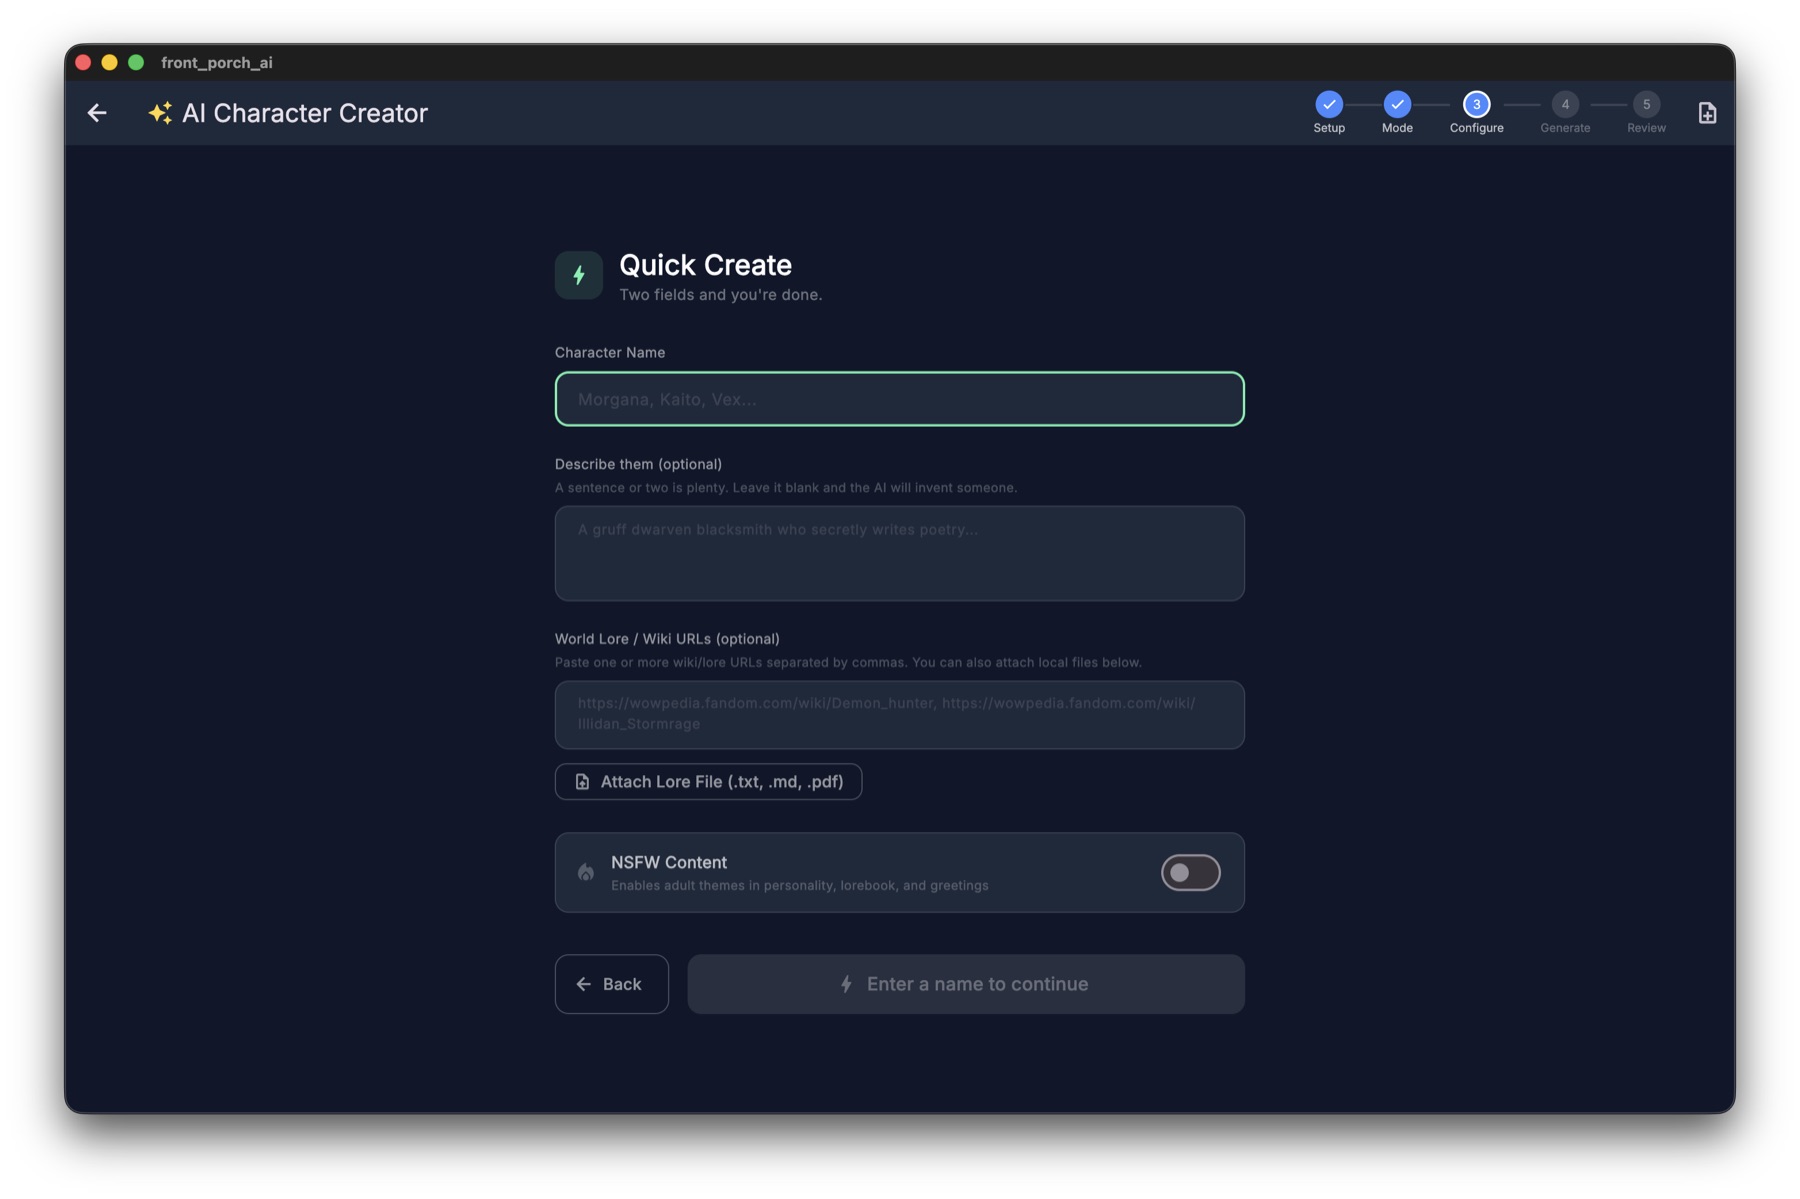
- Build one by hand — click Create New for the manual editor.
- Import one — see Importing Characters below.
Once you have a character, click its card to start chatting.
2. The chat screen
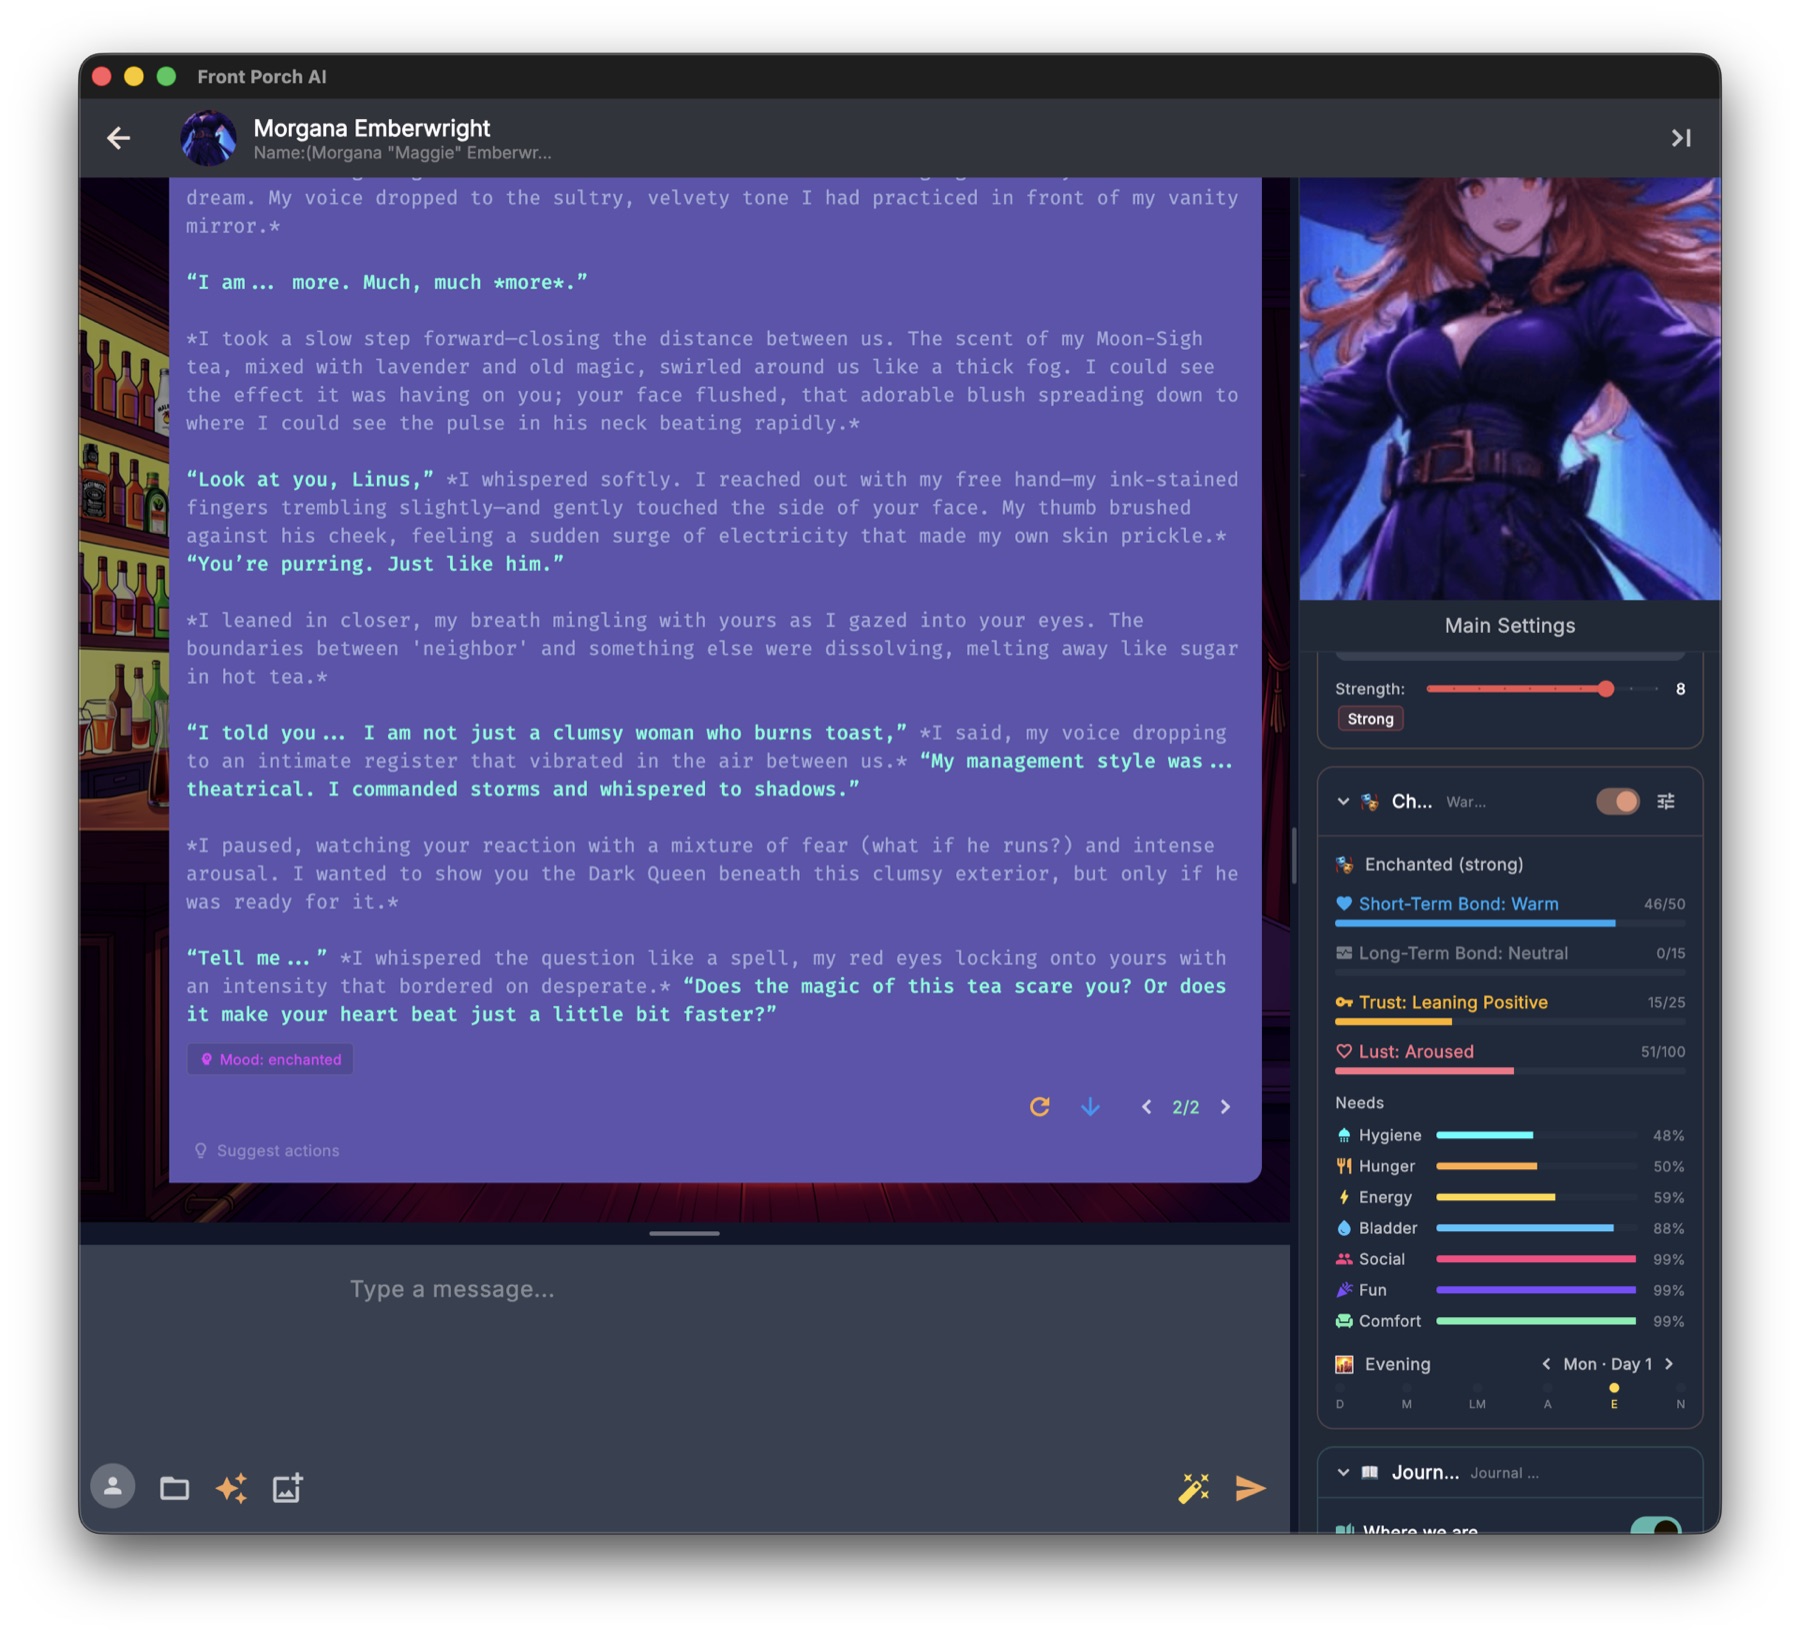
- The middle is your conversation. Dialogue and actions are styled differently so scenes are easy to read.
- The right sidebar shows the character's current emotion, your bond and trust levels, the story clock and weather, and memory — all driven by the Realism Engine.
- The bottom input bar is where you type. Enter sends; Shift + Enter makes a new line. Drag its top edge to make it taller. The magic-wand button in that bar is Impersonate — the AI drafts your next message instead of the character's. Type a few words first and it carries on from them.
3. Send something
Type a greeting and press Enter. The reply streams in live, word by word. While it's generating, a red Stop button lets you cut it short at any time.
Two nice touches you might notice:
- If your model is a "thinking" model (one that reasons before answering), its private reasoning is tucked into a Thought chip above the reply — tap it if you're curious.
- After each reply, the sidebar quietly updates — mood shifts, bond changes, time passing. That's the Realism Engine at work.
4. Message controls
AI replies have controls:
- Regenerate — roll a fresh version of the most recent reply. Old versions aren't lost: use the left/right arrows to flip between takes.
- Continue — "keep going" from where the most recent reply stopped.
- Edit — change a message's text directly.
- Fork — branch the whole conversation from any point to explore a "what if."
5. Tweak as you go
Settings → Generation holds the dials: response length, creativity (temperature), repetition control, and more. The defaults are sensible — you don't need to touch anything to have a great time.
Everything auto-saves. Close the app mid-scene and pick it up tomorrow exactly where you left off.
Importing Characters
Front Porch AI speaks the same character-card language as the rest of the community, so thousands of ready-made characters just work.
Supported formats
- PNG character cards — the standard format used by SillyTavern, Chub.ai, and friends. The character data is embedded inside the image itself.
- JSON files — the same data without the picture.
- Backyard AI archives (
.byaf) — if you're coming from Backyard AI, your characters can escape here intact. - Places (
.fpworld) — a whole setting in one file: lore, climate and cover art. Import these from the Worlds page in the left sidebar..fpworldfiles need Front Porch AI 1.2 or newer.
How to import
- Click Import Card on the home screen and pick one or more files.
- Use Bulk Import to point at a whole folder — it scans everything inside, subfolders included.
- Use Import BYAF for Backyard archives.
- Once your library has characters in it, those same options live behind the download icon in the library toolbar: Import Cards, Import Folder, and Import Backyard AI (.byaf).
- Or open The Stoop from the left sidebar and download characters, whole group casts, and places straight into your library — no files to handle at all.
Downloading from a character site like Chub.ai or aicharactercards.com works the same way: grab the PNG or JSON in your normal web browser, then Import Card it. (Those two sites used to be browsable inside the app; that built-in browser was removed because it was unmoderated and unreliable on some Linux machines. The Stoop is the in-app place to discover characters now.)
After importing you can tag, edit, duplicate, and organize characters into folders — and groups can go into folders too. Everything on the card comes across: personality, greetings, sample dialogue, alternate openings, and attached lorebooks.
For the full story on cards, the AI editor, and lorebooks, see the Characters Guide.
Next Steps
Make it feel alive → Settings → Porch Life, then the Realism Engine guide. Bond and trust, story time, Pockets, Clock In (they have a job), Chaos, needs.
Build your cast → the Characters Guide. The card format, AI-assisted creation and editing, lorebooks, expression images, and organizing a big library.
Explore everything else → Chatting, Porch Life, Image Studio, Web & Phone, User Guide.
Stuck or curious?
- FAQ — quick answers to common questions.
- Troubleshooting — when something's not working.
- Discord — the friendliest place to ask. I read everything.
Welcome to the front porch. Your characters are waiting, and your stories are yours alone. 🪑✨